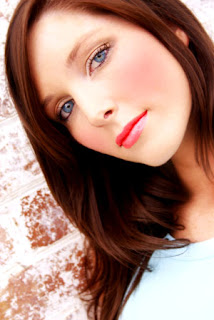
 In this simple photoshop tutorial we will take an image of a woman and enhance photos with the use of simple photoshop tools such as the lasso, color correction, the color pallete and with the use of the air brush we will enhance the photograph using simple photo manipulation techniques. This photo enhancement tutorial will teach you how to beautify a womans face with makeup.
Photo Enhancement / Photo Manipulation / Beautify Effect / Make up Art Tutorial
1. Open an image that you would like to 'picture enhance'. Make sure it is something very plain, perhaps a girl with no make up. That just makes the project all the more fun :)

2. We will start by adding some saturation to this picture, as you can see it is really washed out and pale. Lets give the girl some color. Go to Images > Adjustments > Hue/Saturation.
I will be bumping up the saturation about 35%. See what looks good for your image.

3. Lets work on her lips, give her some color, to help highlight her beauty. Using the Pen tool trace around the shape of her lips. And then load the path as your selection.

4. After you have loaded the path, and it is selected press "Command J" so it cuts your selection into a new layer. You can change the layername to lips.
5. Now lets add some color. Adjust the hue/saturation for the lips layer, I will be using 30%. Basicly this is bumping up the natural color of her lips.
6. While the lips layer is still selected, go to Images > Adjust > Color Balance. I will be using these values below.

7. We are coming along now, lets add some depth to her eyes. Using the Lasso tool, go around her eyes, and again "command J" to a new layer and label it "Eyes"

8. Using the burn tool with a small brush size of 10 and exposure of 40, highlight under and over the eyes to add definition. If you feel you might have made the eyes too dark, just drop the opacity of the "eyes" layer down. I dropped mine down to 30%
9. Now lets add some rosie cheeks. Use the color picker, grab a tone from the lips and adjust it so its not too strong. I am using color #db6a6e. Select the brush tool and make sure you are using a large brush. Mine is set to 90 with 30% Opacity. Create a fresh new layer and highlight the cheek area with your brush. You won't need much. Since you are on a new layer, you can use the eraser tool to remove parts you do not like. After you are happy with your artwork, adjust brightness contrast to add depth.
You are done!


8 comments:
thanks for sharing
thnx nur..nanti dah balik uniten n amek balek laptop I try =P
waaa lawa gile!
nnt cres nak try..ehee ;]
cool
thx ya
nur, stuck nih... command J tu ape??
1 more..color sampler or color picker?shortcut? =P
sory bru bk blog... command j tue mean ctrl j > utk wat new layer sory...
color picker tue alat sedut color yg adew kt tool bar.. kte guna alat tue untk dptkn color yg sama.
Post a Comment