Saturday, May 30, 2009

The Night Shooting


The night shooting usually takes place on a long exposure that is why all the moving luminous objects leave very evident lines and flames. Let’s try making some experiments with a luminous Ferris wheel.

We’ll need in this case the Radial Blur filter and some of experience working with layer masks.

1. Firstly we need to create a copy of the layer (CTRl+J).


Select after that the next option, Filter > Blur > Radial Blur, where we have to move the slider on Amount on 10 selection. Choose next on the Blur Method list the Spin selection. Change after that the Quality value on Good and press OK.


Create The Night Shooting in Photoshop CS3

Make one more copy of the layer and give to the new copy the Screen blending mode.

Create The Night Shooting in Photoshop CS3

2. Merge down the last two layers by choosing the command Layer > Merge Down (Ctrl+E) and set for the new result the Screen blending mode.

Create The Night Shooting in Photoshop CS3

This layer we’ll hide with a mask, selecting in the menu the next option: Layer > Add Layer Mask > Hide All.

Create The Night Shooting in Photoshop CS3

Next we’ll select the Brush Tool (B) to paint the mask accurately with white color to make visible only the wheel.


3. When painting the mask, we need to try not to touch the unmoving objects, like the pavilion or the wheel’s supports. Their blurring could be very inappropriate for our final result. On the other hand, we need all the moving parts of the wheel to be painted out very accurately.

Create The Night Shooting in Photoshop CS3

4. Make a copy of the layer

Create The Night Shooting in Photoshop CS3

and select for it Filter > Blur > Gaussian Blur, having a radius of 10.


Create The Night Shooting in Photoshop CS3

Make a click on the mask and fill it with black color (Edit > Fill).

Create The Night Shooting in Photoshop CS3

Create The Night Shooting in Photoshop CS3

ext we need again to process the layer’s mask by painting the wheel’s zones with white color using the Brush Tool (B) with Hardness on 45%.


5. Get back to the Background’s layer and select the Eyedropper Tool (I) for select the colors of blue neon lights on the wheel.


Choose after that Select > Color Range with Fuzziness parameter of 119.


Copy the marked elements on a new layer: Edit > Copy and Edit>Paste.

Apply also for the new layer the next selection: Filter > Blur Radial with the same parameters we have used at the beginning.


6. The final stage includes changing Opacity for layers with mask


Finally we’ll paste together all the picture’s layers in a single layer, choosing in the menu the next option: Layer > Flatten Image.


Happy Night Shooting! :)

Panographies: Panoramas on Steroids

If you like Hockney, you’ll love this.

Do you ever look up at the sky, a towering office building, or an expansive landscape and wish your photos could capture everything you can see with your eyes? We do.

Our pal Mareen does this neat thing she calls panography. Taking dozens of photos of a scene, she assembles a patchwork of images that more accurately represents what your eyes see when you’re not looking through a viewfinder.

Call it super wide-angle panorama or call it panography, we think it’s awesome.

Read on to learn how you can make one yourself!

Step 1: Setup

Go out into the world and find something interesting to shoot. Once you’ve found something, pick your point of view and make sure you can see everything you want to shoot without moving from your position.

Manually set the white balance, focus, f-stop, and shutter speed on your camera. This ensures that it doesn’t light meter every shot and your photos aren’t all differently exposed. If you want your panography to consist of many individual photos, zoom in a bit. If it’s your first try, you may want to stay zoomed out so you’ll have fewer shots to assemble at the end.

NOTE: The more photos you take, the more RAM your computer will need to make the panography. Also, some cameras don’t give you the option of manually setting the f-stop and shutter speed. Sometimes one of your preset modes (for example, landscape mode) will keep your settings relatively uniform. Give it a try… if all else fails, automatic mode still works, the effect is just a little different.

Step 2: Take your shots

Point and shoot. Don’t move from your position, but do move your lens in all directions. Try tilting your camera to different angles to soften the straight panorama look. And keep in mind that the more your shots overlap, the easier it’ll be to assemble your panography later.

Make sure you cover every spot with at least one picture. We tend to only photograph the interesting spots, like lines and busy areas, and oftentimes forget to get the plain areas. Leave a shot out and you’ll be left with a hole in your final piece with no way to fill it!

Step 3: Prepare your files

Step-3b-small.jpgBatch resize your imagesUnload your camera and, using Photoshop, resize your photographs (try width or height of 800 pixels). It’s tedious to do this manually for each photo; so to expedite the process, record the resizing and saving of one photo as a new Photoshop Action. Then go to File > Automate > Batch to select the new action and apply it to your entire folder of panography photos.

NOTE: If you want to save the originals, don’t forget to duplicate your folder before you resize.

Step 4: Prepare your Canvas

Make a large canvasCreate a fairly large new RGB canvas to work on. If it turns out the canvas is too small, you can always add some space later (Image > Canvas). Copy the new 800px versions of your images into your canvas–5 to 10 images at a time ought to be manageable.

Step 5: Assemble your Panography

Assemble your images like a puzzle!Set the opacity of each photo to about 50%. Using the Transform function (Ctrl/Apple+T), start rotating each photo to fit the ones next to it. Be careful to make sure you’re rotating (you should see a curved arrow tool when you’re near a corner) and not skewing the photographs. Now go photo by photo and assemble your panography like a puzzle. It will take a while to get it right, so be sure to save your work as you go along.

Step 6: Finalize your panography

Make final adjustments to your flattened panographyWhen you’re finished assembling the photos together, make final color, contrast, and levels adjustments. Go to the layer palette and add a new adjustment layer of any kind by clicking the round black/white symbol.

To share your panography or post it online, just combine all the layers (Shift+Ctrl/Apple+E), and resize your image. Be sure to save this file separately instead of overwriting the original, which you’ll want to keep in case you want to make changes later.

Congratulations! You just made your very first panography!


Saturday, May 9, 2009

Photo Enhancement Tutorial - Photo Manipulation Tutorial

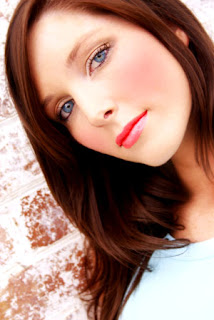
In this simple photoshop tutorial we will take an image of a woman and enhance photos with the use of simple photoshop tools such as the lasso, color correction, the color pallete and with the use of the air brush we will enhance the photograph using simple photo manipulation techniques. This photo enhancement tutorial will teach you how to beautify a womans face with makeup.

Photo Enhancement / Photo Manipulation / Beautify Effect / Make up Art Tutorial

1. Open an image that you would like to 'picture enhance'. Make sure it is something very plain, perhaps a girl with no make up. That just makes the project all the more fun :)

2. We will start by adding some saturation to this picture, as you can see it is really washed out and pale. Lets give the girl some color. Go to Images > Adjustments > Hue/Saturation.
I will be bumping up the saturation about 35%. See what looks good for your image.

3. Lets work on her lips, give her some color, to help highlight her beauty. Using the Pen tool trace around the shape of her lips. And then load the path as your selection.

4. After you have loaded the path, and it is selected press "Command J" so it cuts your selection into a new layer. You can change the layername to lips.

5. Now lets add some color. Adjust the hue/saturation for the lips layer, I will be using 30%. Basicly this is bumping up the natural color of her lips.

6. While the lips layer is still selected, go to Images > Adjust > Color Balance. I will be using these values below.

7. We are coming along now, lets add some depth to her eyes. Using the Lasso tool, go around her eyes, and again "command J" to a new layer and label it "Eyes"

8. Using the burn tool with a small brush size of 10 and exposure of 40, highlight under and over the eyes to add definition. If you feel you might have made the eyes too dark, just drop the opacity of the "eyes" layer down. I dropped mine down to 30%

9. Now lets add some rosie cheeks. Use the color picker, grab a tone from the lips and adjust it so its not too strong. I am using color #db6a6e. Select the brush tool and make sure you are using a large brush. Mine is set to 90 with 30% Opacity. Create a fresh new layer and highlight the cheek area with your brush. You won't need much. Since you are on a new layer, you can use the eraser tool to remove parts you do not like. After you are happy with your artwork, adjust brightness contrast to add depth.

You are done!


design by Nur for Cool Style Graphics.